
Patentes americanas e estrangeiras emitidas e pendentes

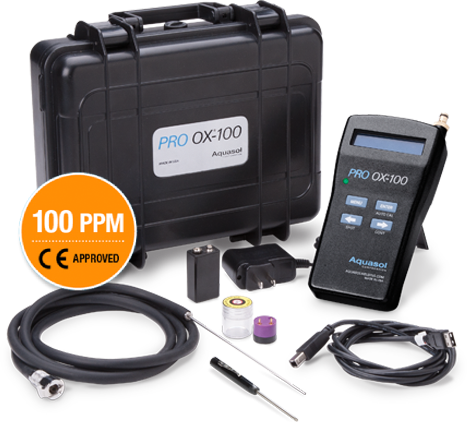
O monitor de oxigênio digital programável Pro OX – 100 da Aquasol é projetado para dar às operações o nível possível mais preciso de leituras de oxigênio.
Famoso internacionalmente por seus recursos altamente avançados e de baixo custo, este monitor autocalibrador de solda de oxigênio com uma bomba interna mede exatamente desde uma resolução de 0,01% (100 ppm) e é ideal para aplicações de purga e outras soldagens.
Grande orgulho na fabricação do Pro OX® – 100, aprovado pelo CE nos EUA pelo ISO Certified Factory da Aquasol.
O OX® – 100 vem equipado com muitos recursos avançados como sua capacidade de registro de dados que permite que os operadores criem registros permanentes de dados de tempo reais (em intervalos de 15 segundos) e exportem até 50 pontos de dados a planilhas no formato do Microsoft® Excel.
O Pro OX-100 também oferece um recurso programável e integrado de múltiplos idiomas com instruções na tela que estão disponíveis em inglês, espanhol, alemão e português.Junto com especificações e compatibilidades de frequência e voltagem, o Pro OX-100 é o monitor de solda de oxigênio mais universal disponível no mercado internacional hoje em dia..
Data Logging Capabilities
Download Driver Software by completing this form.
Archive Records with Software Reporting
• Create permanent records of real time data (at 15 second intervals for continuous mode or as needed in spot mode) of oxygen levels for critical welding operations
Easy-to-Use Conversion Software
• Capture and export 50 data points in just clicks to Microsoft® Excel and plain text format
Convenient and Quick Data Offload
• The PRO OX-100 offloads data to a PC via a convenient USB interface at a high-speed, ensuring data integrity
Download Driver Software by completing this form.
Arquive Registros com Relatório de Software
Software de Conversão Fácil de Usar
Subida Rápida e Conveniente de Dados
LOCAL:
CONTÍNUO:
Autocalibrado e Certificado
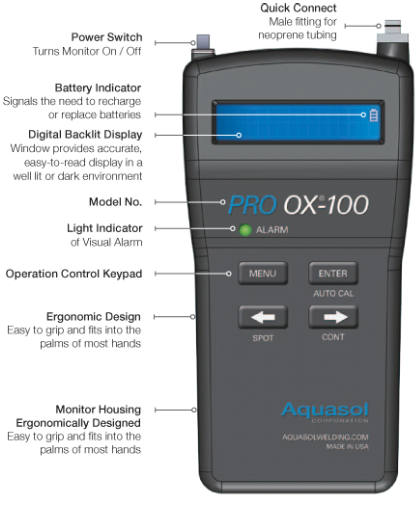
Alarme Audiovisual
Carregador e Bateria Recarregável de 9V Destinados para Voltagem Universal
Nomeação CE
Idiomas
Programável em quatro idiomas populares para satisfazer as necessidades internacionais
Instalando a Tubulação de Extensão de Neoprene:
Para Definer o Idioma:
Para Ajustar Data e Hora:
Para Ajustar o Alarme em LIGAR/DESLIGAR:
Para Visualizar o Registro:
Para Limpar o Registro:
Calibrando o PRO OX-100:
Modo de Leitura Local:
Modo de Leitura Contínuo:
Obs. O Alarme Audiovisual é Ajustado de Fábrica para “Alarme Desativado”
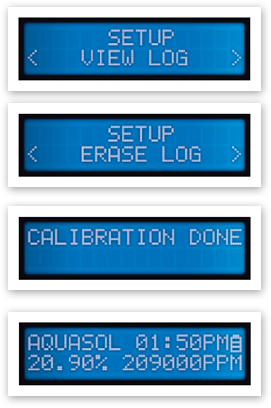
To View Log:
1. Press the “Menu” button and use the “RIGHT” → arrow button until “SETUP: VIEW LOG” is displaying
2. Press the “ENTER” button to select the “LOG” viewer
3. Use the “RIGHT” → and “LEFT” ← arrow buttons to navigate through the log. The screen will display up to a total of 50 data points
4. Press “Enter” to save settings and exit
To Clear Log:
1. Press the “MENU” button and use the “RIGHT” → arrow button until “SETUP: ERASE LOG” is displaying
2. Press the “ENTER” button to begin erasing all data points in the log
3. Once the screen displays “DONE”, all the data points have been erased from the log
4. Press “Enter” to save settings and exit
Calibrating the PRO OX-100:
Self-Calibrating Model:
1. When the PRO OX-100 unit is at the main screen, the operator can press the “AUTO CAL” button to begin calibration
2. The unit will automatically begin to sample ambient air and automatically calibrate
3. Once the calibration is complete, the unit will display “CALIBRATION DONE”, and immediately return to the main screen
4. The unit is now ready to use
2-Point Calibration Model:
1. All Pro OX-100 Oxygen Monitors are factory calibrated and certified
2. 2-Point calibration procedure is required only when the sensor is replaced
3. Involves 2 steps using high point, “CAL HI”, and low point, “CAL LO”
4. “CAL HI” samples ambient air with the goal being 20.9% oxygen
5. “CAL LO” uses 99.999% argon with the goal being >100 ppm oxygen
6. Each point in the calibration process take approximately 14 minutes to finish
7. Press the “MENU” button and use “RIGHT” arrow button until “SETUP: CAL HI” is displayed
8. Press “ENTER” to confirm and again to being calibration
9. The pump will shut off automatically upon completion. Restart the monitor to exit
10. Insert the sample probe in an argon line with flow rate set at 20 CFH
11. Press the “MENU” button and use the “RIGHT” arrow button until “SETUP: CAL LO” is displayed
12. Press “ENTER” to confirm and again to begin calibration
Spot Reading Mode:
1. When the PRO OX-100 unit is at the main screen, press the “SPOT” button, and the unit will then begin running
2. Once the spot reading is complete, the PRO OX-100 will display the oxygen percentage value
3. Press the “LEFT” ← arrow button to return to main screen
Continuous Reading Mode:
1. When the PRO OX-100 unit is at the main screen, press the “CONT” button
2. During operation, the unit will constantly update the latest oxygen level
3. To exit out of continuous mode, press the “CONT” button, after the screen displays a reading
| Nº DO ITEM | DESCRIÇÃO | DIMENSÕES | PESO | ||
|---|---|---|---|---|---|
| INGLÊS (in) | SISTEMA MÉTRICO (mm) | INGLÊS (in) | SISTEMA MÉTRICO | ||
| P-OX KIT | Kit de assessórios e monitor de oxigênio PRO OX-100 | 11 x 9 x 4 | 279 x 227 x 102 | 4.00 lb | 182 g |
| P-OX KIT Euro | Kit de assessórios e monitor de oxigênio PRO OX-100 com carregador europeu | 11 x 9 x 4 | 279 x 227 x 102 | 4.00 lb | 182 g |
| P-OX Sensor | Sensor de oxigênio PRO OX-100 | 1 x 1 | 21 x 20 | 0.03 lb | 16 g |
| P-OX Batt | Bateria NiMH de 9V PRO OX-100 | 2 x 1 x 1 | 48 x 26 x 17 | 0.12 lb | 54 g |
| P-OX Charger/US | Carregador de bateria NiMH de 12 VPRO OX-100 com plugue tipo americano | 3 x 2 x 1 | 8 x 60 x 25 | 0.10 lb | 59 g |
| P-OX Charger/EU | Carregador de bateria NiMH de 12 VPRO OX-100 com plugue tipo europeu | 3 x 2 x 1 | 8 x 60 x 25 | 0.10 lb | 59 g |
| P-OX USB | Cabo USB (72 ou 1.8 m) ” PRO OX-100 | 4 x 4 x 1 | 102 x 102 x 25 | 0.11 lb | 50 g |
High-frequency may be an issue with monitors receiving readings around specific welding machines. To test for this, place a piece of metal foil/sheet metal between the monitor and the machine, to protect it from interfering with the circuit board. If the monitor reading is normal, high-frequency equipment is interfering.
Any new 9V rechargeable battery can be substituted in the PRO-OX 100. The specification for the 9V battery is NiMH 280mAh. Additionally, any ordinary (non-chargeable) battery may be used as well.
The PRO OX-100 logs data that can be transferred to a computer via USB cable. Conversion software enables easy capture and export of 50 data points to Microsoft® Excel and Plain text format. Data is recorded in 15 second intervals in CONTINUOUS mode or as needed in SPOT mode.
In order to obtain the data logging software required for the Pro OX®-100, go to aquasolwelding.com, click on the products drop down menu and select “PRO OX-100”. Then click on the provided link, Download “Software and Driver” zip file, complete the form including unit serial number and other required information. Within 24 hours you will receive an email with software attachments for 32 and 64 bit machines.
Calibration can be performed on a weekly basis. There are no other specific recommendations regarding maintenance besides general care of the unit such as cleaning, proper storage, etc.
If a unit is used very frequently (daily) it should be calibrated once a week. If it is not used frequently, it should be calibrated once every three weeks.
Every oxygen monitor is shipped with a Calibration Certificate, Certification of Conformance, and a Test Certificate. The PRO OX-100 does not require a new certificate for every calibration. With the Auto Calibration feature on these units, calibration can be done by the user. There is no need for any unit to be calibrated by Aquasol or a third party.
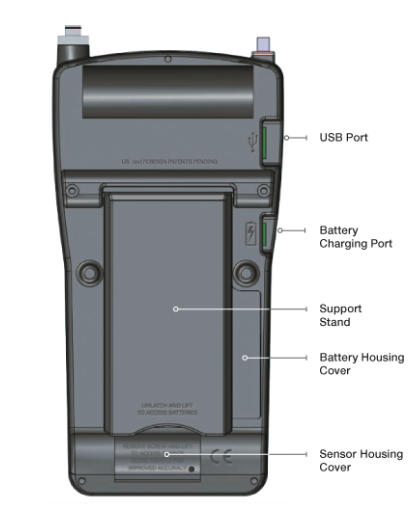
The Pro OX-100 is battery operated, but can also be operated through a standalone power supply. For specifications on use, refer to section 2.1.1 of the manual. With a full-charge, the battery can supply continuous power for up to two (2) hours.
When using The Pro OX-100 Oxygen Monitor for LESS than two (2) continuous hours, ensure a fully charged battery is installed into the battery housing. Then turn the power switch to the ON position. Continue to use the monitor until operation is complete or the battery indicator displays the “low battery indicator”.
When using the The Pro OX®-100 Oxygen Monitor for MORE than two (2) continuous hours be sure to turn the power switch to the OFF position. If battery is installed, remove from the housing. Then connect the standalone power supply/charger cable to the port. After this step, connect the power supply/charger plug into the nearest working outlet (110V for US type/220V for EU type). Then simply turn the power switch to the ON position. The Pro OX-100 is capable of operating indefinitely with a standalone power supply.
CAUTION: ALWAYS REMOVE THE BATTERY IF USING THE MONITOR FOR MORE THAN 2 CONTINOUS HOURS. FAILURE TO DO SO CAN OVERHEAT THE BATTERY AND SERIOUSLY DAMAGE THE PRODUCT AS WELL AS VOID THE WARRANTY.
The PRO OX-100 can operate in temperatures as low as 0°C (32°F) and as high as 50°C (122°F).
The sensor has a lifespan of approximately one year under normal operating conditions (see manual for operating temperature, proper storage guidelines, etc.).
Sensors are available for purchase. Each sensor has a one year warranty. It is not recommend to keep stock of extra sensors. Sensors are readily available to ship and are lightweight.
If there is an issue starting the pump when pressing the SPOT or CONT button, the pump may be damaged. Contact customer service for an RGA authorization.
If there is no display when the toggle switch is in the ON position, either the battery is drained or the LCD is damaged.
If the battery is drained, simply recharge the battery or use the standalone power supply. Refer to section 1.2.2B of the PRO OX-100 manual for instructions.
If the screen does not light up, replace the battery.
If the LCD is damaged, the unit must be sent to Aquasol Corporation for repair. Contact customer service for an RGA authorization.
If strange symbols appear on the screen when the toggle switch is in the ON position, the display is damaged.
The unit must be repaired. Contact customer service for an RGA authorization.
The keypad is damaged if the keys do not correspond with what is on the display. The unit must be sent to Aquasol Corporation for repair. Contact customer service for an RGA authorization.
To test the PRO OX-100 audiovisual alarm, follow the guidelines below:
If user is unable to set the alarm, the program could be corrupted. Contact customer service for an RGA authorization.
If the alarm does not sound or flash, the alarm is either disabled or damaged. In order to fix this, refer to the manual Section 2.1.3. and follow the instructions. If the issue still persists, the unit must be sent to Aquasol Corporation for repair. Contact customer service for an RGA authorization.
If the alarm light does not blink, even though the sound goes off, the light indicator is damaged. To fix this, the unit must be sent to Aquasol Corporation for repair. Contact customer service for an RGA authorization.
Ensure the sensor is plugged into the sockets properly. After running for 30 seconds, if calibration is successful, the screen will display “CALIBRATION DONE”.
© 2024 Aquasol Corporation. All Right Reserved.
